Virtual try-on for Tiendanube

If you are reading this article, then there is a big chance that you have already come to a conclusion that virtual try-on features should become a part of your Tiendanube store. The question is not if virtual try-on is beneficial anymore but rather how complex will the implementation be.

Luckily, the integration of Camweara into your Tiendanube shop is significantly easier than you could imagine. No marketplace application installation is needed, no complicated development project is required. Camweara integrates via Tiendanube Códigos externos functionality and allows the addition of virtual try-on functionality to supported product pages.

This article describes the entire process of integration of Camweara into your Tiendanube store, starting from the registration on Camweara website until the verification of correct work of all features before your clients start to use virtual try-on functionality.

Why You Should Add Virtual Try-On Feature to Your Tiendanube Shop?

The first concern which every merchant may have when trying to integrate any service is whether the integration will affect the way you manage your online store.

The good news is that Camweara integration does not affect your work with products in your Tiendanube shop. Camweara adds the virtual try-on experience directly to the supported product pages and you can continue to manage your products in Tiendanube the same way as you did before the integration.

For your clients, it means that they can move from looking at the images of the products to the actual preview of the supported eyewear, jewelry, footwear, clothing or other accessories using their own device before making a purchase decision. The result of that is an interactive product page where your client stays within your Tiendanube shop.

How to Integrate Camweara Virtual Try-On with Tiendanube

Step 1: Create Your Camweara Account 

All begins with creating your Camweara account. And this is where you should start if you haven’t created it yet.

  • Create your Camweara account and log in to the dashboard.

Now that you are signed in, it is time to upload the products that you are going to enable for virtual try-on.

Next, you may proceed to configure your product catalog.

Step 2: Upload Your Products

It seems to be a very obvious and easy step, however, it is worth mentioning that you should use product images of good quality as it determines the quality of the virtual try-on experience that customers receive.

  • Upload the products that you would like your customers to try on virtually.
  • To provide your customers with the best virtual try-on experience, you should use high-quality product images. Quality images contribute to more accurate visualization.

Once your products are configured, it is time to generate the integration code.

Step 3: Copy Your Integration Code

Here you need to perform a very quick action that will actually integrate your Camweara with your Tiendanube shop.

  • After configuring your products, copy the generated integration code.

Step 4: Add the Integration Code to Tiendanube

Log in to your Tiendanube Admin and navigate to:

Settings → External Code (Códigos externos)

Then perform the following actions:

  1. Navigate to the Tracking Codes section.
  2. Choose the Para la tienda tab.
  3. Paste your Camweara integration code to the tracking code field.
  4. Click Guardar to save your changes.

Camweara integrates through Tiendanube’s External Code (Códigos externos) feature, which allows adding the virtual try-on experience without installing the separate marketplace application.

Now there is only one thing left before you launch the experience.

Step 5: Verify the Integration

Before launching the experience to your customers, it is worth spending a couple of minutes to verify whether everything is displayed properly. It is a very simple thing to do and this is how you can avoid any problems.

  • After saving the integration code, open the supported product page.
  • Verify whether the Camweara Virtual Try-On widget displays properly on the page.
  • Before publishing the feature, test it on desktop and mobile devices to ensure everything works correctly.

If the widget is displayed and operates properly, your integration is completed.

What Happens After the Integration?

Once you complete these steps, all you need to do is just wait.

Customers visiting the supported product pages will be able to launch the Camweara Virtual Try-On experience right in your Tiendanube shop. They will not rely on the photos of the product only but will be able to interact with the supported products through virtual try-on without leaving the product page.

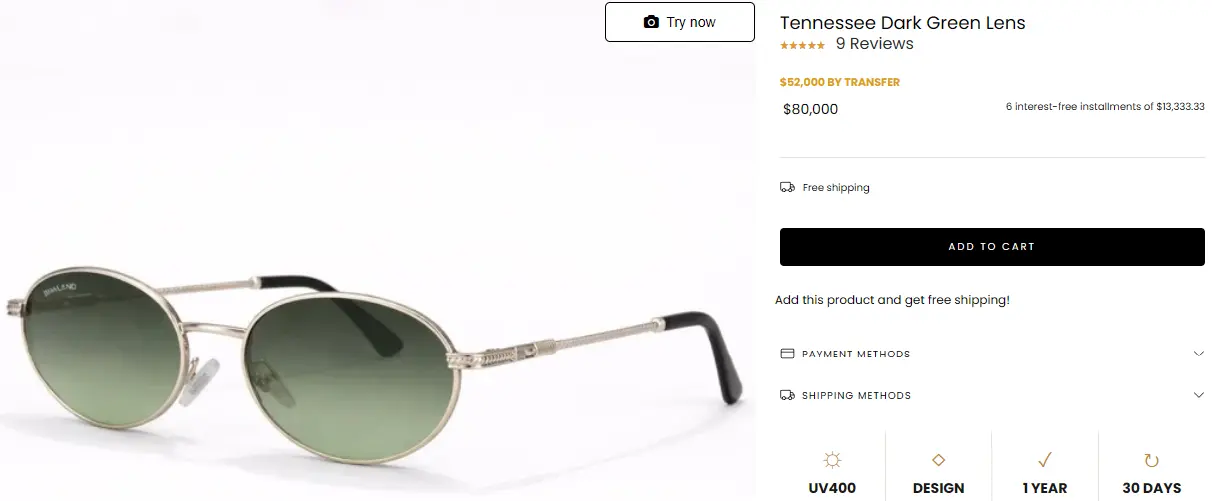
After a successful integration, the Virtual Try-On feature will appear on supported product pages, similar to the example shown below. Customers can simply click the Try now button to launch the virtual try-on experience directly from the product page.

Virtual try on for Tiendanube

Best Practices Before Going Live

Before making the feature available in your shop, spend a few minutes to check everything once again. It’s always recommended to test the experience on desktop and mobile as most of the customers use them for this purpose.

Review the uploaded products to make sure they are displayed properly and then open several different supported product pages to ensure the widget appears consistently across your catalog. These simple checks will help to guarantee that your customers will have the experience you expect when they begin using the virtual try-on feature.

Related Post